Link: Rootme
Initial Enumeration
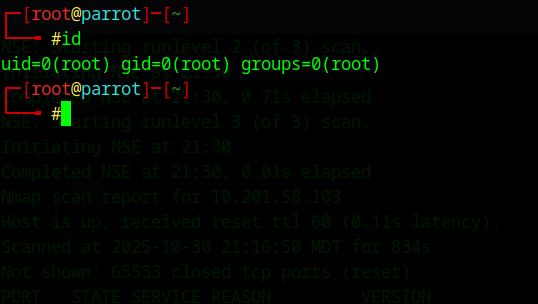
When starting a CTF, we always need to gather information on the system until we find a potential vulnerability that can benefit us. To start off, lets perform an nmap scan. An nmap scan should always be one of the first things to do so we can get an idea of what services our target is running. Make sure to scan ALL ports to get a full picture as to what our target looks like.
nmap -vv -p- -T4 -O -sV -sC [target ip]Explanation of command:
- -vv: Very verbose output
- -p-: Scan all ports
- -T4: Aggressive scan to scan ports faster, scale from 1-5.
- -sV: Service version detection and info
- -sC: Run default scripts against target (useful for more detailed service enumeration)
Refer to this image for the next 3 questions in task 2:

T2, Question 1
How many ports are open?
A: 2
T2, Question 2
What version of Apache is running?
A: 2.4.41
T2, Question 3
What service is running on port 22?
A: ssh
Enumerating the WebApp
There are only two services available to us, SSH on port 22 and HTTP on port 80. SSH will usually be useless to us at the beginning of a CTF unless we possess a valid username and preferably their credentials. This only leaves us with the HTTP website. As we still don’t have a foothold into the system yet, we are still in ‘enumeration mode’ trying to find vulnerabilities the website may posses.
Visiting the website initially doesn’t give us too much to go off of. Inspecting the website using developer tools is normally a good place to start enumerating, however, it doesn’t give us any extra information this time around.

However, our next question asks to run GoBuster on the website to see what directories we can find. Directory enumeration is an essential enumeration tactic to use against a website, as it allows us to gather web page / directory information on the website. This will allow us to visualize what directories are available to us, and allow us to discover any web pages that can get us a foothold into the system. So using GoBuster, we’ll scan this website in directory enumeration mode using the directory-list-2.3-medium.txt file (A common wordlist containing common website directory names).
gobuster dir -w /usr/share/wordlists/dirbuster/directory-list-2.3-medium.txt -u http://[target ip]Explanation of command:
- dir: Run GoBuster in directory enumeration mode; scan the website for valid URLs.
- -w [wordlist path]: Tells GoBuster what wordlist to use when enumerating directories in dir mode. The path to the wordlist used in the command may vary from system to system, make sure you know where you have this wordlist located at.
- -u [target URL]: Tells GoBuster what website to enumerate directories on.
After a minute or two, we should have the following output on screen. You can press Ctrl + c to end the command when you notice GoBuster isn’t finding any more website directories on screen:

We can now head back to our website and view these new directories. The URL http://[target ip]/uploads appears to be an empty directory (for now). /css and /js contain the CSS and JavaScript files needed to run the website correctly. However, /panel appears to be the most interesting URL, as it allows us to upload files to the website (I wonder what we can upload here). This web page would be a good candidate for us to investigate for vulnerabilities, as uploading malicious files to the server could potentially get us a foothold into the system. Thus, we are (temporarily) out of enumeration mode, and are now looking for a vulnerability to exploit.
The next question requires us to find the hidden directory, since /panel has the most potential, I am willing to bet that this is the answer.
T2 Question 5
What is the hidden directory?
A: /panel
WebApp Exploitation
The next question that is asked of us is to upload and obtain a reverse shell, using the /panel page to do so. The first thing we need to do is identify what server side scripting language is being used by the website. If we want the reverse shell to execute correctly on the server side, we need to execute it using this language. The easiest way to find this out is by using a browser extension called “Wappalyzer,” which shows you what technologies a website is running. From the screenshot below, we find that the website is running PHP:

Now we need to find the corresponding reverse shell. To get one, I would recommend using this site here. It provides an extensive list of reverse shells in many different languages other than just PHP for many different scenarios. A good PHP reverse shell we can use is the shell called PHP PentestMonkey. Type it in the search bar and enter in your IP and desired port. For the port number, type in a port that is typically not used by any services on your computer i.e. 1234, 4444, 7777 etc. Setting the port number tells the reverse shell what port to connect to on our pc at our designated IP, we don’t want it to connect to an already used port, such as port 80.

Now, download it to your machine by clicking the white button next to the “Show Advanced” toggle. We are downloading a PHP reverse shell, so make sure your chosen name ends in .php. For example shell.php.
In order for us to receive our reverse shell, we need to use a netcat listener to pick up the connection on our desired port. On your machine, type in the command:
nc -lvnp [port]Explanation of command:
-l: start netcat in listener mode (listen for our reverse shell)
-v: verbose output
-n: numeric IPs only. Skip DNS lookups. Is faster and avoids DNS leaks
-p [port]: configure the port to listen on
Replace [port] with the same port number you typed in when configuring your reverse shell on revshells.com. When the reverse shell makes a connection to our IP at its configured port, our netcat listener will be ready to intercept the request.
Now head back to the website at /panel and upload your reverse shell.
Normally, our shell should have been uploaded, but it looks like the server has prevented people from uploading .php files:

A common way to bypass filetype uploading restrictions is to use another file extension that still designates the original filetype, but is written differently than its original file extension. For example, we can rename our reverse shell from shell.php to shell.php3. A PHP file can have the file extensions …
- .php
- .php3
- .php4
- .php5
- .phtml
… and still execute perfectly fine. Experiment, and rename your PHP file using the list of extensions above, and try uploading them to the server. One of them should work, and upload successfully to the server.
Great! Now our payload should be somewhere on the server, the question now is finding out how we can execute it. If we remember back to our GoBuster scan, we found a /uploads directory that was empty. I’m willing to bet that that is where we can execute the payload we just uploaded to the server. Head over to /uploads, make sure your netcat is set up, and click on your payload to make the server execute it.

Looking back at our netcat connection, we should now have a shell. Our next question asks us to find the user.txt flag. Since we don’t immediately know where this flag may be, we can use the “find” command to do it for us.
find / -type f -name user.txt 2>/dev/nullExplanation of command:
/: this is the directory in which find will search for our file, in this case, the / directory signifies the entire file system.
-type f: this tells the find command what to look for, in this case, it will attempt to find a type of file.
-name user.txt: this tells the find command the name of the file to look for; user.txt
2>/dev/null: this segment of the command essentially tells whatever command is running to output error messages in /dev/null, instead of in the console output. Creates less clutter
When the command finishes running, we should now have the location of user.txt. Cat the file to get the flag.
T3 Question 1
user.txt
A: THM{y0u_g0t_a_sh3ll}
Privilege Escalation
Since we now have a foothold into the system, we should now be focused on tasks such as establishing a permanent presence in the system, enumerating the target system, and escalating privileges. We are essentially in “post exploitation mode.” Our next question asks us to find vulnerable files with the SUID bit set, so we are most likely focusing on privilege escalation.
To find files with the SUID bit set, we can once again resort to the find command. The command looks similar to our previous command, so I’ll omit the explanations for the parameters we have already seen:
find / -type f -perm /4000 2>/dev/nullExplanation of command:
-perm /4000: this part of the command tells the find command to find a file with the SUID bit set
We should now have a long list of files with the SUID bit set, the hard part is identifying which file is the odd one out. With more CTF experience, you will get a better sense of which files and binaries should not have the SUID bit set in a linux system. If you don’t know which file stands out, you can visit GTFOBins and enter in each of the file / binary names until you find an entry that resembles the file. GTFOBins is essentially a site that compiles a large list of common binaries and how pen testers can easily exploit them to gain root privileges. You can think of a binary as a program or application stored as a file on the linux filesystem.
T4 Question 1
Search the system for files with the SUID bit set, which file stands out?
A: /usr/bin/python
While we’re on the subject of GTFOBins, it can actually be used to answer the next question. As you might have seen, GTFOBins has an entry for the python binary. Though the command outputs python2.7 as the SUID binary, the entry on GTFOBins works for this version of python.
On GTFOBins, find the entry for python, and scroll down to the SUID section. GTFOBins will list the linux command you can execute to escalate your privileges. It usually starts off by having you install the vulnerable binary. Since the vulnerable binary is already on the system, we can skip the first line (this goes for most binaries). Execute the next command on the target:
./python -c 'import os; os.execl("/bin/sh", "sh", "-p")'NOTE: make sure the path to your python binary is set. As shown in the picture, GTFOBins shows the python binary located in the current directory, make sure you are either in the correct directory or point towards it:

We are now the root user! Now all that’s left is to get the root.txt file. Head over to /root and cat the file.
T4 Question 3
root.txt
A: THM{pr1v1l3g3_3sc4l4t10n}
Leave a Reply